
The Secret to Crispy Healthy Pizza Is a Clay Griddle
If your homemade pizza never quite gets that crispy, golden crust, your pan is likely the problem. Most baking sheets and pizza stones trap moisture, conduct heat unevenly, or are coated with materials you do not want near your food at high temperatures. A pure clay griddle changes all of that.
At Miriam’s Earthen Cookware, we have heard from our customers who discovered that their Miriam’s clay griddle made the best pizza crust they had ever cooked at home. No parchment paper tricks. No ceramic pizza stone full of questionable materials. Just a simple, natural clay surface that absorbs and radiates heat the way traditional flatbread ovens have for centuries.
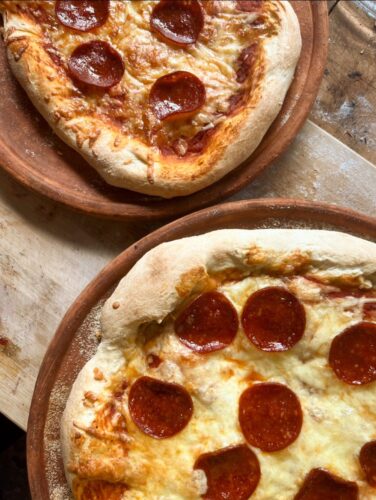
From the author: I have used both the Large Griddle and the Large Pan to make pizzas at home. For a classic New York style, I always reach for the Griddle. If I’m going for a deep Chicago style, then I always go for the Large Pan. Both work incredibly well in achieving the perfect pizza crust.
This week we’re covering why clay griddles produce such exceptional pizza, how to get the most out of yours, and three healthy pizza recipes, including a whole wheat crust and a sourdough pizza crust, you can make tonight.
Why a Clay Griddle Makes Better Pizza
Most home cooks assume a pizza stone is the gold standard for homemade pizza. But pizza stones are typically made from cordierite, ceramic, or composite materials, and many are coated or sealed with substances that are not disclosed on the label.
Miriam’s clay griddles are made from 100% primary, all-natural clay sourced in the USA. There are no glazes, no synthetic coatings, no additives, and no heavy metals. The clay is tested and certified free of lead and cadmium. What touches your pizza dough is nothing but unaltered, pure earth. Beyond purity, the physics of clay cooking matter here:
Clay absorbs moisture. The porous surface of a clay griddle pulls excess moisture away from the bottom of your crust as it cooks, which is exactly what creates that crackly, crispy texture people pay extra for at a good pizzeria.
Clay radiates far-infrared heat. Rather than blasting the dough from below with direct conductive heat (which can burn the bottom before the top is cooked through), clay emits gentle far-infrared waves that penetrate the dough from all directions. The result is an evenly cooked crust, crispy on the outside, soft and airy on the inside.
Clay retains heat exceptionally well. Once your griddle is hot, it stays hot. Every time you open the oven, a metal pan loses heat immediately. Clay holds it, keeping your pizza cooking at a consistent temperature throughout.
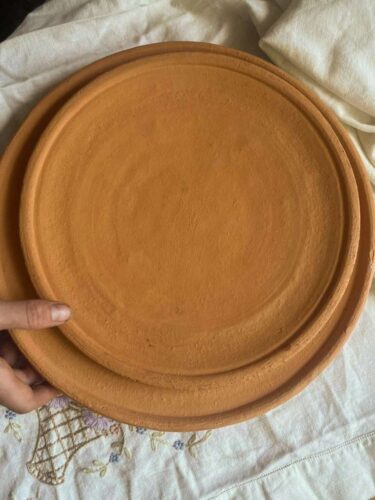
Miriam’s Set of Two Clay Griddles
The Miriam’s Griddle Set includes two pure clay griddles that work together beautifully for pizza making, one for cooking your pie and one for warming or serving a second pizza at the same time. Both griddles are handcrafted, unglazed, and completely free of any synthetic materials.
The set is ideal for families, for entertaining, or simply for anyone who likes having a second surface ready when the first pizza disappears faster than expected (it happens). They are stovetop and oven safe, and like all MEC cookware, they become more naturally non-stick the more they are used and seasoned.
How to Prepare Your Clay Griddle for Pizza
Before your first use, make sure your griddle is properly seasoned. A well-seasoned griddle will release dough more easily and develop better browning over time.
To season: Rub a thin layer of oil (ghee, avocado oil, or coconut oil all work well) over the surface of the griddle. Place it in a cold oven, then bring the oven up to 200°F and let it bake for at least 20 minutes, or up to one hour. Turn off the oven and allow the griddle to cool inside. Full seasoning instructions can be found here.
For pizza specifically: Preheat your griddle in the oven while the oven comes up to temperature. Slide or press your pizza dough directly onto the warm surface, the heat contact at the moment of placement starts crisping the crust immediately.
A light dusting of cornmeal or semolina on the surface before adding your dough can also help with release and adds a subtle texture to the bottom of the crust.
3 Healthy Pizza Recipes for Your Clay Griddle
Whole Wheat Margherita Pizza
A classic, kept simple. The whole wheat crust adds a nutty depth of flavor that pairs perfectly with fresh tomato and mozzarella.
Makes: 1 medium pizza (serves 2–3)
Prep time: 20 minutes (plus 1 hour rise time)
Cook time: 12–15 minutes
For the whole wheat crust:
– 1 cup whole wheat flour
– 1 cup all-purpose flour (or swap for additional whole wheat for a heartier crust)
– 1 tsp active dry yeast
– 1 tsp sea salt
– 1 tsp raw honey or maple syrup
– 2 tbsp olive oil
– ¾ cup warm water
For the toppings:
– ½ cup crushed San Marzano tomatoes (or quality canned whole tomatoes in glass)
– Fresh mozzarella, sliced
– Fresh basil leaves
– Drizzle of extra virgin olive oil
– Flaky sea salt
Instructions:
1. Combine the warm water, honey, and yeast in a bowl. Let sit for 5–10 minutes until foamy.
2. Add olive oil to the yeast mixture, then stir in both flours and salt until a shaggy dough forms. Knead for 8 minutes until smooth and elastic.
3. Place the dough in a lightly oiled bowl, cover, and let rise for 1 hour at room temperature.
4. Preheat your oven to 400°F with your clay griddle inside.
5. On a lightly floured surface, stretch or roll the dough to fit your griddle. Dust the griddle with a pinch of cornmeal, then carefully lay the dough on the hot surface.
6. Spoon the crushed tomatoes over the dough, leaving a small border. Add the mozzarella.
7. Bake for 12–15 minutes until the crust is deeply golden and the cheese is bubbling.
8. Remove from oven, top with fresh basil, a drizzle of olive oil, and flaky salt. Slice and serve immediately.
Sourdough Pizza with Roasted Vegetables
If you maintain a sourdough starter, this is the pizza you have been waiting to make. The natural fermentation gives the crust a slight tang and a chewy, open crumb that holds up beautifully against heartier toppings.
Makes: 1 medium pizza (serves 2–3)
Prep time: 15 minutes (plus overnight cold ferment)
Cook time: 12–15 minutes
For the sourdough crust:
– 1 cup active sourdough starter (100% hydration)
– 1½ cups bread flour or all-purpose flour
– ½ tsp sea salt
– 1 tbsp olive oil
– 2–4 tbsp water, as needed
For the toppings:
– ½ cup ricotta cheese
– 1 small zucchini, thinly sliced
– ½ red onion, thinly sliced
– Handful of cherry tomatoes, halved
– Fresh thyme
– Drizzle of olive oil
– Salt and pepper
Instructions:
1. The night before: Mix starter, flour, salt, and olive oil into a soft dough. Add water a tablespoon at a time until the dough is slightly tacky but workable. Cover and refrigerate overnight (or up to 48 hours. Longer ferment, more flavor).
2. Remove dough from the fridge 1 hour before baking and allow it to come to room temperature.
3. Preheat oven to 400°F with your clay griddle inside.
4. Stretch the dough gently by hand into a rough circle, sourdough dough has more elasticity, so be patient and let gravity help you.
5. Dust the hot griddle with cornmeal and lay the dough on the surface.
6. Spread ricotta over the base. Arrange zucchini, red onion, and cherry tomatoes on top. Scatter fresh thyme, drizzle with olive oil, and season with salt and pepper.
7. Bake for 12–15 minutes until the crust is golden at the edges and the vegetables are slightly charred.
8. Slice and serve straight from the griddle.
Simple Flatbread Pizza with Hummus and Fresh Toppings (No-Yeast, Quick)
For nights when you want pizza without the planning, this no-yeast flatbread comes together in minutes and is one of the most versatile healthy pizza recipes you will make.
Makes: 2 flatbread pizzas (serves 2)
Prep time: 10 minutes
Cook time: 8–10 minutes
For the flatbread:
– 1 cup all-purpose or spelt flour
– ½ tsp baking soda
– ½ tsp sea salt
– ½ cup plain whole milk yogurt
– 1 tbsp olive oil
For the toppings:
– ½ cup hummus (store-bought or homemade)
– Handful of arugula
– Sliced cucumber and cherry tomatoes
– Crumbled feta cheese
– Lemon zest and a squeeze of fresh lemon juice
– Drizzle of olive oil
Instructions:
1. Mix flour, baking powder, and salt together. Stir in yogurt and olive oil until a soft dough forms. Divide into two equal portions and press each into a thin round.
2. Preheat your oven to 450°F with the clay griddle inside. Alternatively, heat the griddle directly on the stovetop over medium heat.
3. Lay each flatbread onto the hot griddle and cook for 3–4 minutes per side until golden and slightly charred in spots.
4. Spread hummus over each flatbread. Top with arugula, cucumber, tomatoes, and feta.
5. Finish with lemon zest, a squeeze of lemon, and a drizzle of olive oil. Serve immediately.
Tips for the Best Pizza on a Clay Griddle
Always preheat. A cold griddle placed in a hot oven is not the same as a griddle that has been heating with the oven from the start. Give your griddle at least 20–30 minutes of preheat time.
Do not overload with toppings. Heavy, wet toppings release moisture into the crust and fight against everything the clay griddle is doing for you. Less is more. Use quality ingredients and let them speak for themselves.
Use a light hand with sauce. Thin layers of sauce, just enough to coat the dough, will give you a crispier crust than a thick, wet base.
Let the dough come to room temperature. Cold dough straight from the fridge fights you during shaping and can crack on the hot clay. Always let it sit out for at least 30 minutes before working with it.
Season your griddle regularly. The more you use your clay griddle, the better it performs. A well-seasoned griddle develops a natural patina that improves release and adds a subtle complexity to everything cooked on it.
Use a Pizza Peel. For best results, use a pizza peel dusted with a little flour or semolina to transfer your assembled pizza onto the preheated griddle. It gives you control, keeps the shape intact, and gets it onto the hot surface in one clean motion.
Frequently Asked Questions
Can I use my clay griddle on the stovetop for pizza?
Yes. The flatbread recipe above works beautifully on the stovetop. For traditional pizza with toppings, the oven tends to give more even results since the heat surrounds the pizza from all sides.
Do I need to use parchment paper?
No. A well-seasoned clay griddle with a light dusting of cornmeal does not need parchment paper. In fact, parchment paper would block the moisture-absorbing effect that gives clay-cooked pizza its signature crust.
What oil is best for seasoning my clay griddle?
Ghee, avocado oil, and coconut oil are all excellent choices. Avoid vegetable or canola oil as these can go rancid and leave a sticky residue over time.
Can I cook gluten-free pizza dough on a clay griddle?
Yes. Clay’s gentle heat works especially well with gluten-free doughs, which tend to be more delicate and prone to burning on high-heat metal surfaces.
How do I clean my clay griddle after pizza?
Allow the griddle to cool completely before cleaning. Use warm water and a soft natural brush or cloth, no soap. If anything is stuck, soak briefly in warm water. Dry thoroughly before storing.
The Bottom Line
Healthy pizza is less about eliminating ingredients and more about using real ones, and cooking them on a surface that does not add anything unwanted to your food. A pure clay griddle from Miriam’s Earthen Cookware gives you the crispy crust, the even cook, the much needed break for your body from toxic leaching from traditional pans, and the peace of mind that what your family is eating is as clean as the ingredients you put into it.
The Miriam’s Set of 2 Griddles is a practical, lasting investment in the way your kitchen works. Whether you are making a classic margherita, a slow-fermented sourdough pizza, or a quick weeknight flatbread, clay is the surface that has been getting this right for thousands of years.
Pick up your Miriam’s Griddle Set and start making pizza the way it was meant to be made.


0 Comments
Write a Comment