
FAQs:
Cooking & Care (1)
In order to provide to you the safest cookware, all of Miriam’s Earthen Cookware is made from the highest quality 100% pure and primary clay. They are handmade without using any additives throughout the making process (i.e. processing of the clay, making, finishing, or firing of the pots). No glazes are used to cover imperfections either, so it is very natural for minor surface imperfections to be present.
Also note, we do not guarantee a perfect, machine-cut fit for lids. The utmost care is taken to ensure they are made to fit well on the pots without the use of any additives to control or inhibit the clay’s natural shrinking properties. For your benefit, you may see we have individually hand-marked the best fit for some lids with a pencil (especially for ones that sit better at one particular position). These pencil marks can be easily erased with a regular pencil eraser, if you don’t need them.
It is not a perfectly fitting lid that locks steam inside your MEC pots and pans. There are many other unique features that contribute to how steam management works, and you can read about it here: MEC’s Steam Management Properties Explained.
The imperfections on the ‘Alternate Line’ are more pronounced than the ones on the ‘Regular Line’.
Cookware Production (1)
In order to provide to you the safest cookware, all of Miriam’s Earthen Cookware is made from the highest quality 100% pure and primary clay. They are handmade without using any additives throughout the making process (i.e. processing of the clay, making, finishing, or firing of the pots). No glazes are used to cover imperfections either, so it is very natural for minor surface imperfections to be present.
Also note, we do not guarantee a perfect, machine-cut fit for lids. The utmost care is taken to ensure they are made to fit well on the pots without the use of any additives to control or inhibit the clay’s natural shrinking properties. For your benefit, you may see we have individually hand-marked the best fit for some lids with a pencil (especially for ones that sit better at one particular position). These pencil marks can be easily erased with a regular pencil eraser, if you don’t need them.
It is not a perfectly fitting lid that locks steam inside your MEC pots and pans. There are many other unique features that contribute to how steam management works, and you can read about it here: MEC’s Steam Management Properties Explained.
The imperfections on the ‘Alternate Line’ are more pronounced than the ones on the ‘Regular Line’.
Troubleshooting (1)
Cracks form for three reasons:
1) Exposed to more heat than needed for long periods of time:
During the firing process, Miriam’s Earthen Cookware withstands more than 2000 Degrees Fahrenheit, so it can certainly withstand high cooking temperatures. However, during cooking, the pot needs only a low heat setting to accomplish cooking your food (without damaging the nutritional cells), if the pot is let to cook on settings higher than medium, instead of indiscriminately throwing the heat onto the food, the pot will crack to form a vent for the heat to escape so it can maintain just the right amount of heat to complete the cooking process in this healthy manner.
Comparing this to cooking in metals and other materials: they need higher amounts of heat for cooking typically higher than medium settings. Many times a pot half or more full can only accomplish cooking at medium-high heat or more. Natural clay is an excellent retainer of heat and as a result, a lower stove setting accomplishes cooking just as well. On the other hand, conventional materials heat & cool at the same time so more heat is needed overall!
2) Long periods of uneven & sporadic heat:
If a pot is subject to uneven heat for long periods of time, one side of the bottom will heat up more than the other, causing the heated bottom portion to pull away from the cooler side.
In addition, high concentrations of thermal shock due to sporadic heating (like it happens with glass/ceramic cooktops) may damage the pot further. This is typically seen with glass/ceramic cooktops; as a result, we recommend using a heat diffuser on these cooktops. This will help distribute the heat more evenly to the pot.
3) Dry cooking:
Cooking high and dry is another cause. Cracks may form if the heat is too high, i.e. cooking above medium-low heat, especially when cooking dry or semi-dry recipes, or if cooking for a long time. It’s best to cook these kinds of recipes (like stir-fries and sautés) after the pot is fully seasoned. Additionally, heat settings should not be higher than medium-low heat on gas stoves or medium heat (at the most) on electric stoves with diffusers.
If you avoid cooking with high and uneven heat, you can have a pot that lasts for a very long time! Please note that if your pot has a crack, the pot should not shatter. Cracks develop over time and it is still safe to use your pots despite these cracks, and if you go back to cooking at less heat, the crack should naturally heal (in this case, the crack will still be visible, but no leaking will come from it). For any cracks that continue to leak, here are two methods to help heal these cracks:
Any cracks that cause leaking can be healed by these two methods:
Method 1:
Thoroughly clean the pot with water and baking soda and wipe it dry with a cotton cloth. Set it aside to dry for about 5-10 minutes (if pot is already clean & dry, skip this step). Apply some oil (any cooking oil, like olive, coconut, or sesame seed) thoroughly with your hands onto the full surface of the pot (both inside and outside). Heat it in the oven at 250 degrees F for 25-30 minutes. Turn oven off; let pot cool down slightly before taking it out. After taking out of oven, let it sit for about 12 hours for the crack to fully heal.
This process can also be done to strengthen the pot, if you ever experience chipping.
Method 2:
Make a paste with 2 tsp. water + 1 tsp. flour (any whole grain or other flour). Wash pot thoroughly and apply paste on outside and inside of pot along the crack line and a bit of the surrounding area. Let the paste dry slightly, then heat the pot with lid off on the stove on the lowest heat setting, until the rim is hot to the touch. When the pot is heated, clay platelets expand and come together and the paste will seal the crack. Wait for the pot to completely cool down before washing it.
You can repeat this process one more time if you still see liquids leaking from the crack, but in most cases, doing this one time should seal and heal the crack quite well.

After healing the crack using either method, you can additionally put 16″ or 14″; copper or steel wire (available at home improvement stores) under the rim of the pot, and twist the edges of the wire for it to stay in place (see image above).
It is important that the pot/pan gets to rest for 1-2 days after the healing process. When using for cooking after that please cook only on low to medium-low heat (medium heat maximum, if using on electric stove with diffuser). This process can heal cracks about 97% of the time.
Having tried this, if the pot continues to leak, here are ideas on other uses for this pot.
Usage & Care (1)
Miriam’s Earthen Cookware’s useful life cycle can span for decades, or even across generations. However, there may come a time where you can no longer cook with it due to damages or long-term wear. Despite this, there are several uses for your MEC product, even after it can no longer cook!
Note: Before writing off your MEC product as unusable due to a crack, please note that 80% of cracks can be healed, and you can use MEC for cooking again after healing a crack. However, there are rare instances where the crack does not heal, rendering the pot unusable.
Here are some recommended uses for your pot/pan after its useful life cycle:
For Sprouting Beans & Lentils:

Sprouting beans and lentils in Miriam’s Earthen Cookware is an easy process yeilding rich and nutritious sprouts. Because these pots are breathable and rich in nutrients, the process of germination is fast and food looks rich and healthy, for example, as you can see in the picture, the shoots are not limp or weak in appearence – the way they turn out in metal or plastic containers. For Sprouting: Soak the lentils for 8-12 hours, beans for 24 hours. Drain the water and add your soaked lentils and beans to the pot. Set aside in a warm, dark place covered for 24 hours for lentils and 36 hours for beans. If lentils/beans were purchased more than 6 months ago, increase soak and germination times by 8 hours.
For Fermenting Sauerkraut, kefir, yogurt, and more:
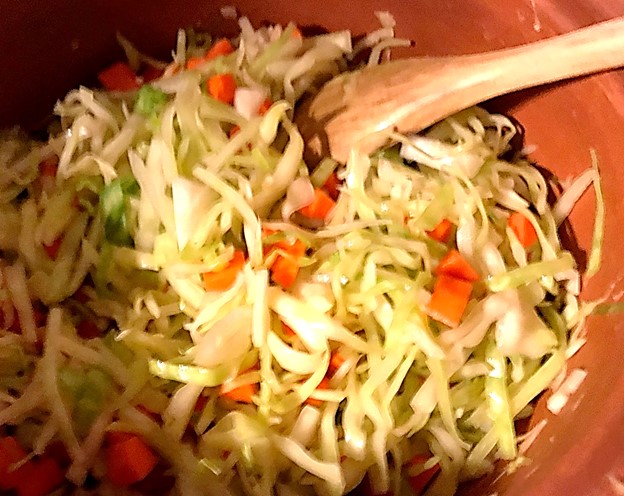
Fermenting in clay has been scientifically proven to be better than other vessels because it enhances gas transportation and it keeps conditions inside the pot suitable for lactic acid bacteria growth, by allowing for the pot’s porous walls to ‘exhale’ carbon-dioxide, a bi-product of lactic acid bacteria development. With Miriam’s non-toxic and well-designed wide mouth pots, this process is much healthier and easy.
While fermenting could take days or sometimes even weeks to accomplish in other vessels, because these pots are breathable, it allows just enough oxygen to get in and beautifully ferments your food in 1-2 days the longest. For Fermenting: Add your prepared ingredients to the pot, add sea salt, mix thoroughly, cover by placing lid up-side-down (this allows for lid to press against the food inside). Set aside to ferment for 24-48 hours. It is a good idea to season your pot before using for fermenting.
For storing food in or outside of the fridge:
 For Food Storage: You may store your eggs, flour, beans, potatoes in a safe and non-toxic way in these pots. The EMF radiation from refrigerator causes depletion of essential nutrients but storing your food outside (of the refrigerator) in these pots can prevent this nutritional loss. Customers who store their eggs say “they last longer and taste fresher”. If storing eggs, please place a folded towel in the bottom of the pot as a cushion.
Storing Fruits & Veggies: It can be used to store fresh fruits and vegetables in the fridge. Produce lasts longer and remains fresh because the inert pot prevents depletion of nutrients caused by EMF radiation (electro-magnetic field radiation).
Organic Sprouting: Your beans/lentils will thrive in the breathable, nutrient rich pot/pan and sprout more fully than in other vessels.
Organic Gardening:
 For Organic Gardening: Add soil, add your seeds, place the pot in a spot that can get sufficient sunlight. It is a good idea to elevate the pot slightly to allow for air circulation and drainage. A tip to watering your plants: Check to see if the soil is dry and if it is dry, water the plant. Don’t overwater, to the extent that you see water stagnant on the surface.
Other uses:
Natural refrigirator during camping:
Going camping? Or living off the grid and need a place to store fresh food for a few days? Your damaged pot can make a great natural refrigerator. Just wet the whole pot under running water for 2 minutes, drip dry, place the foods you need refrigerated inside, dip the lid in water, then close the pot. You can safely store milk, fruits, vegetables, bread, and so on for some time. The pot & lid will let the water evaporate very slowly, keeping the food inside cool and safe. How long food can stay without going bad depends on the weather and your location, so we recommend storing small quantities starting out.
Natural Fertilizer:
If you can’t find any extra use from your MEC product because it is too damaged, don’t worry! Since our pots are 100% compostable, you can safely dispose them by breaking them up into smaller pieces and using them as an all-natural fertilizer for your garden.


