
12 Traditional and Healthy Ways to Cook Eggs in Miriam’s Earthen Cookware
YES, you absolutely can cook eggs in clay cookware, and once you try it, you may never go back to metal or non-stick pans. Our pure clay cookware conducts heat gently, retains it evenly, and adds nothing harmful to your food. The result is eggs that are softer, more flavorful, and cooked without a trace of synthetic coating or leached metal.
If you are a health-conscious home cook, a fan of traditional cooking methods, or simply trying to reduce toxins in your kitchen, this post walks you through 12 proven ways to cook eggs using Miriam’s pure clay pots and pans.
Why Cook Eggs in Clay Cookware?
Before jumping into the methods, it helps to understand why clay makes such a difference for something as ordinary as an egg. Most conventional pans, non-stick Teflon, aluminum, even stainless steel, leach substances into food during cooking. Non-stick coatings degrades and releases harmful toxins. Aluminum even migrates into foods! With clay, there is nothing synthetic to break down. Miriam’s cookware is made from 100% primary, all-natural clay sourced in the USA. It is tested and certified free of lead, cadmium, and all heavy metals. The pots and pans contain no additives, glazes, dyes, or plasticizers. What you get is a completely inert cooking surface that lets the natural flavor of your food come through. For eggs specifically, clay’s gentle far-infrared heat matters a great deal. Eggs are delicate proteins. High, aggressive heat from metal pans causes them to seize, toughen, and lose moisture quickly. Clay radiates a softer heat that cooks eggs more thoroughly, gently and evenly, preserving moisture and producing a noticeably creamier texture, especially in scrambled eggs and omelettes.
To understand the full picture of why non-toxic cookware matters for your family’s health, read: Healthy and Green Cookware
12 Methods of Cooking Eggs in Clay
1. Scrambled Eggs
What it is: Eggs beaten with a splash of water or milk, stirred slowly over low heat until just set.
Why clay makes it better: The even, gentle heat from a Miriam’s clay pan means the proteins cook slowly without rubbering. The result is soft, creamy curds that hold moisture far better than eggs scrambled in a stainless or non-stick pan.
Quick tip: Use the Miriam’s Small Pan for a single or double serving. Warm the pan on low for two minutes before adding butter or a small amount of healthy oil (such as coconut). Keep the heat at medium-low and fold the eggs gently, do not stir aggressively.
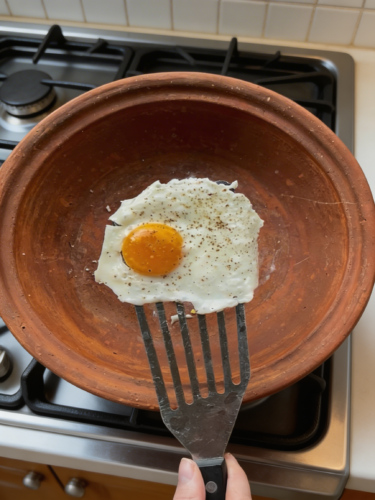
2. Fried Eggs (Sunny-Side Up or Over Easy)
What it is: Eggs cracked directly into a lightly oiled pan and cooked until the white is set and the yolk is runny or cooked to preference.
Why clay makes it better: Once an Miriam’s clay pan is properly seasoned, its patina becomes naturally non-stick. Eggs slide cleanly without any synthetic coating. The gentle radiant heat sets the whites without forming the rubbery, browned edges common with metal pans on high heat.
Quick tip: Season your Miriam’s pan well before first use following MEC’s seasoning instructions. Use just a small amount of butter or coconut oil. Keep the heat at medium. The pan retains heat well, so you do not need to crank it up.
3. Poached Eggs
What it is: Eggs cracked into simmering (not boiling) water and cooked gently until the white is set around a still-runny yolk.
Why clay makes it better: A clay pot holds a steady, gentle simmer better than a thin metal saucepan, which tends to have hot spots and fluctuates in temperature. Consistent temperature is the single most important factor in a successful poach. The water in an MEC pot stays at a calm, even simmer rather than a rolling boil that tears the white apart.
Quick tip: Use a small or medium Miriam’s pot filled with 3–4 inches of water. Add a splash of white vinegar to help the whites cohere. Lower the egg in gently with a small bowl. The pot’s steady heat does the rest! Enjoy the most delicious and nutritious poached eggs.
Quick tip: Use a small or medium Miriam’s pot filled with 3–4 inches of water. Add a splash of white vinegar to help the whites cohere. Lower the egg in gently with a small bowl. The pot’s steady heat does the rest! Enjoy the most delicious and nutritious poached eggs.
Sharing an experience: One morning, at 4:00 a.m., Miriam received a call on the business line. The person on the other end was bursting with excitement. He was calling from the mountains of Australia and said, “I don’t know what time it is there, and I am sorry if I called too early – but I just had to call to tell you how delicious my poached eggs turned out. I’ve been making poached eggs my whole life in a metal pot, and they have never tasted this good.” This is an experience very dear to Miriam’s heart, and moments like these are what make up the heartbeat of our work.
4. Hard-Boiled Eggs
What it is: Eggs boiled in their shell until both white and yolk are fully set.
Why clay makes it better: Clay’s far-infrared heat penetrates the shell evenly, which helps the egg cook uniformly rather than having a set outer white and an undercooked center. Many MEC users report that hard-boiled eggs cooked in their clay pots peel more easily and have a noticeably less sulfurous smell.
Quick tip:Place eggs in a small Miriam’s pot, cover with cold water by one inch, and bring to a gentle boil on medium heat. Once boiling, reduce to a low simmer and cook for 10–12 minutes for a fully set yolk. Transfer to an ice bath immediately to stop cooking.
5. Soft-Boiled Eggs
What it is: Eggs boiled in the shell until the white is just set but the yolk remains liquid or jammy.
Why clay makes it better: The same even heat penetration that makes hard-boiled eggs come out uniformly set also makes soft-boiled eggs predictably consistent. Because the clay holds temperature steadily, you get reproducible results once you know your timing.
Quick tip: Bring your Miriam’s pot to a gentle boil, lower eggs in carefully, and cook for exactly 6–7 minutes for a jammy yolk. The thick clay walls of the pot help buffer against temperature spikes that can push a soft-boil into a hard-boil accidentally.
6. Steam-Cooked Eggs
What it is: Eggs in the shell (or cracked into a small dish) cooked entirely by steam rather than boiling water.
Why clay makes it better: MEC lids are uniquely designed to condense steam on a cooler underside and return it to the food, a property the we describe as “steam condensing.” This means the cooking environment inside a covered Miriam’s pot is a perfectly controlled steam chamber. Steam-cooked eggs develop a silkier texture than boiled eggs because the heat is even gentler and more indirect.
Quick tip: Add one inch of water to a Miriam’s medium pot, place a Miriam’s Clay Bowl with cracked eggs inside, cover with lid, and steam on medium-low heat for 8–10 minutes. This method is especially good for custard-style steamed eggs, a traditional preparation found in many Asian cuisines.
7. Baked or Shirred Eggs
What it is: Eggs cracked into a shallow clay pan with a small amount of butter or cream, then finished in the oven until the white is set.
Why clay makes it better: Clay is oven-safe and distributes oven heat gently and evenly from all sides, unlike metal bakeware that radiates intense direct heat from the bottom. Shirred eggs baked in a Miriam’s clay pan come out with a set but silky white and a barely-cooked yolk, the classic French bistro standard.
Quick tip: Miriam’s Small Pan moves seamlessly from stovetop to oven. Butter the pan, crack in your eggs, add a tablespoon of cream, and bake at 325°F for 10–12 minutes. Add fresh herbs, cheese, or sauteed greens before baking.
8. Frittata
What it is: An Italian egg dish, essentially an open-faced omelette, finished in the oven with vegetables, cheese, and/or herbs mixed directly into the eggs.
Why clay makes it better: A frittata needs to cook low and slow on the stovetop first, then finish in the oven. This stovetop-to-oven transition is another place where clay truly excels. The even, all-around heat of a Miriam’s clay pan means the bottom of the frittata does not burn before the top sets. And because the surface is naturally non-stick once seasoned, slices come out cleanly.
Quick tip: Use Miriam’s Large Pan. Saute your vegetables first, pour in the beaten egg mixture, cook on medium-low for 5 minutes until edges begin to set, then transfer to a 350°F oven for 10–12 minutes until the center is just firm. Let it rest for 5 minutes before slicing.
9. Omelette
What it is: Beaten eggs cooked quickly in a pan, folded around a filling before serving.
Why clay makes it better: A well-seasoned Miriam’s pan develops a hand-burnished, naturally non-stick patina that allows a thin omelette to fold without tearing. The moderate, even heat prevents the browned bottom that forms in a metal pan on high heat. Clay-cooked omelettes stay yellow and delicate, the way a good omelette should look.
Quick tip: Warm your Small Griddle on medium-low for 2 minutes, add a small amount of butter, pour in two beaten eggs, and use a spatula to gently push the edges inward as the center sets. Add your filling, cheese, herbs, sauteed mushrooms, then fold and serve directly from the pan.
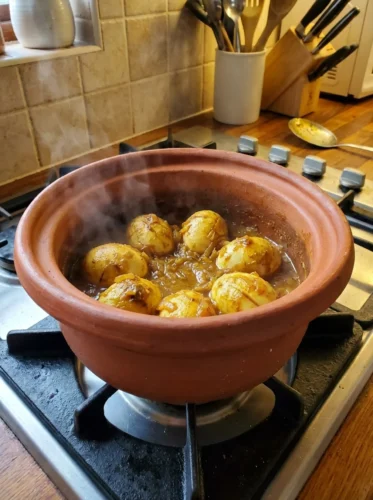
10. Egg Curry
What it is: A deeply spiced sauce, typically made with tomatoes, onions, ginger, garlic, and warming spices, in which hard-boiled eggs are simmered to absorb the flavors.
Why clay makes it better: Egg curry requires a long, slow simmer for the sauce to develop depth. Clay’s ability to maintain a steady, low simmer without scorching makes it ideal. The far-infrared heat also enhances the natural sweetness of tomatoes and the aromatic quality of spices in a way that stainless or aluminum pots do not.
Quick tip: Use a Miriam’s Medium Pot for this. Build your masala base first, cook low and slow until the oil separates, then add your boiled eggs (scored lightly so they absorb the sauce) and simmer together for another 10–15 minutes. The clay pot’s non-reactive surface means tomatoes will not interact with the cookware at all, unlike with aluminum.
11. Shakshuka
What it is: A North African and Middle Eastern dish of eggs poached directly in a spiced tomato and pepper sauce, typically served with crusty bread for scooping.
Why clay makes it better: Shakshuka is another perfect dish for Miriam’s pan. It requires a broad, shallow pan for the sauce to spread out, gentle heat to poach the eggs without overcooking the whites before the yolk sets, and a tight lid to trap steam for the final cooking of the egg tops. Miriam’s Clay Pans are exactly this shape and perform this function beautifully. The sauce also benefits from clay’s far-infrared heat, which deepens the tomato flavor during the simmer.
Quick tip: Build your tomato-pepper sauce in the large Miriam’s pan over medium heat. Once the sauce is fragrant and reduced, create small wells with the back of a spoon, crack an egg into each well, cover with lid, and cook on medium-low for 6–8 minutes. The condensing lid returns steam to the eggs, cooking the tops gently without drying them out.
12. Slow-Cooked Egg Dishes
What it is: Slow-cooked dishes where eggs play a secondary role, like a slow-cooked daal with poached eggs stirred in at the end, or overnight braised greens served with eggs, or a slow-baked egg casserole made ahead for the week.
Why clay makes it better: Miriam’s cookware is purpose-built for slow cooking. Its thick walls retain heat for an extended period after the heat source is turned off or reduced, making it incredibly efficient for low-and-slow preparations. Egg casseroles baked slowly in a clay pot, a dish popular in many traditional cultures, come out with a completely different texture than those baked in a metal pan: custardy, moist, and evenly set throughout.
Quick tip:For a slow-baked egg and vegetable casserole, layer your base ingredients (greens, grains, cheese) in an Miriam’s medium or large pot, pour a seasoned egg mixture over the top, cover with the lid, and bake at 300°F for 35–45 minutes. The clay walls protect the eggs from the harsh dry heat of the oven and keep the interior moist.
Start Cooking Eggs the Healthy Way
If you are ready to move away from synthetic coatings and reactive metals, Miriam’s pure clay cookware is the most natural, time-tested alternative available. Every piece is handmade in the USA, tested and certified 100% pure clay, and designed to serve your kitchen for years.
Browse the full collection and find the right pan or pot for the egg dishes your family loves most.


0 Comments
Write a Comment