
The Non-Toxic Way to Make Yogurt, Kefir & Cheese at Home
The interest in homemade fermented foods has never been higher. Yogurt, kefir, and fresh cheese are showing up in meal prep routines, gut health protocols, and high-protein diet plans across the board, and for good reason! These foods are genuinely nutritious, surprisingly simple to make at home, and far superior to what lines the dairy aisle at the grocery store.
But there is one part of the homemade fermentation conversation that almost nobody talks about: what you make them in. The vessel used for heating milk, culturing yogurt, and fermenting kefir is not a passive container. It is an active part of the process, and the material it is made from matters more than most people realize.
This post covers everything you need to know about how to make yogurt, kefir, and fresh cheese at home, and why Miriam’s pure clay cookware is the cleanest, most natural vessel for it.

Why Make Yogurt, Kefir, and Cheese at Home
The Problem With Store-Bought Yogurt
Walk down the yogurt aisle of any grocery store and you will find a wall of options that have very little in common with traditional fermented dairy. Most commercial yogurts contain added sugars, artificial flavors, thickeners like modified starch and carrageenan, synthetic preservatives, and in many cases far less live culture activity than the label implies. Low-fat versions compensate for lost flavor with sweeteners. Flavored varieties often contain more sugar per serving than a candy bar.
Even products marketed as clean, natural, or probiotic frequently contain undisclosed additives that undermine the health benefits people are buying them for in the first place.
Making yogurt, kefir, and cheese at home gives you complete control over every ingredient, and the result is a nutritionally superior product that costs a fraction of what premium store-bought versions charge.
Health Benefits of Yogurt and Kefir for Gut Health
Yogurt and kefir are among the most well-researched probiotic foods available. The live cultures they contain, Lactobacillus, Bifidobacterium, and in the case of kefir, a broader and more diverse range of bacteria and yeasts, support gut microbiome diversity, improve digestive function, and have been linked to benefits for immune health, mood, and even metabolic function.
Kefir in particular contains a significantly more diverse probiotic profile than most commercial yogurts, with research suggesting it may be more effective at colonizing the gut with beneficial bacteria. Both foods also contain naturally occurring enzymes that support lactose digestion, making them more tolerable for people who are mildly lactose sensitive.
High-Protein Benefits of Homemade Dairy Foods
Full-fat, whole milk homemade yogurt contains approximately 17 grams of protein per cup before straining. Fresh cheese like paneer or farmer’s cheese made from whole milk delivers a concentrated protein punch with minimal processing.
For anyone following a high-protein diet, incorporating homemade fermented dairy is one of the simplest and most cost-effective ways to increase protein intake without relying on processed supplements or packaged products.
What Does Non-Toxic Actually Mean
How Metals and Cookware Can Affect Fermented Foods
This is the part of the homemade fermentation conversation that most blogs leave out entirely.
Fermented foods are acidic by nature. Yogurt, kefir, and fresh cheese all involve acidic milk environments, and acidic foods are very effective at drawing material out of vessels made from reactive materials. Stainless steel, is not entirely inert and has been shown to leach nickel and chromium. Aluminum is significantly more reactive and should not be used for fermentation at all. Non-stick coated pans present their own concerns with the plethora of toxic chemcials they can leach. most glass today is made from borosilicate, and can leach boron a toxin that could cause a multitude of issues to the stomach, kidneys and brain, when in excess.
The vessel used to heat milk before fermentation, and in some cases to culture it, comes into sustained contact with the acidic liquid, which is precisely the condition that triggers leaching from reactive surfaces. For anyone making fermented foods specifically for their health benefits, using a reactive or coated vessel is an absolute contradiction.
Why Natural Materials Matter for Fermentation
Traditional fermentation across virtually every culture in the world happened in clay, wood, or stone vessels, materials that are chemically inert, non-reactive, and introduce nothing unwanted into the food being prepared.
Miriam’s pure clay is particularly well suited to fermentation because it is completely inert even in acidic environments, regulates temperature gently due to its natural insulating properties, and adds nothing to the food it contacts. What goes into a clay pot during fermentation stays exactly as it is, without the variable of a reactive surface altering the chemistry of the milk or the culture developing within it.
Ingredients You Need
Best Milk for High-Protein Yogurt and Kefir
Whole milk is the gold standard for homemade yogurt and kefir. The fat content contributes to a richer, creamier texture and a more satisfying result. Full-fat milk also produces a more stable culture environment, which means a better set and more consistent results.
Raw milk — where available and legal, retains naturally occurring enzymes and beneficial bacteria that pasteurization removes. Many experienced home fermenters prefer it for the depth of flavor and probiotic complexity it produces.
Pasteurized whole milk is widely available and works reliably for all three of the recipes below. Ultra-pasteurized milk (UHT) is not recommended, the high-heat processing it undergoes affects the milk proteins in a way that can prevent yogurt from setting properly.
Goat’s milk is an excellent alternative for those who tolerate it better than cow’s milk, producing a slightly tangier yogurt and kefir with a naturally thinner consistency.
Starter Cultures: Yogurt Culture vs Kefir Grains
For yogurt: You need a yogurt starter culture, either a few tablespoons of plain live-culture yogurt from a previous batch or a scoop of good quality plain store-bought yogurt with live active cultures. The starter introduces the specific bacterial strains that convert lactose into lactic acid and set the yogurt. If you prefer to make your own starter culture from scratch, Miriam has a full yogurt culture guide on the blog.
For kefir: You need kefir grains, small, gelatinous clusters of bacteria and yeast that look a little like small cauliflower florets. Kefir grains are a living culture that can be reused indefinitely with proper care. They are available from online suppliers, natural food stores, or through home fermentation communities where grains are often shared freely.
For fresh cheese: No starter culture is needed for basic fresh cheese. Acid, in the form of lemon juice or white vinegar, does the work of separating curds from whey.
How to Make High-Protein Yogurt at Home
Makes: approximately 1 quart Prep time: 15 minutes Fermentation time: 6 to 12 hours
Ingredients:
- 1 quart whole milk
- 2 tbsp plain live-culture yogurt or yogurt starter culture
Instructions:
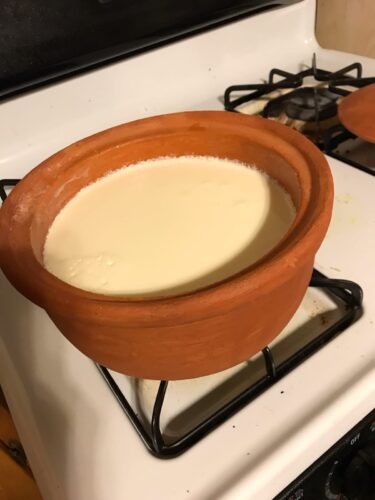
Step 1 — Heat the milk Pour the milk into your Miriam’s pot and heat gently on low to medium heat untilyou can see bubbles on the surface of the milk (about 170 to 180 D F). This step denatures the whey proteins and ensures a thicker, better-set yogurt. The gentle, even heat of pure clay is ideal here. No scorching, no hot spots, and no reactive surface in contact with the milk.
Step 2 — Cool to culturing temperature Remove from heat, open lid and allow the milk to cool for sometime. in 15 mins or so check to see if you can hold your little finger in the milk for 5 seconds (between 105°F and 115°F). This is the sweet spot for yogurt culture activity, warm enough to encourage bacterial growth, cool enough not to kill the cultures. Please note, we don’t recommend leaving a thermometer inserted in the milk because it negatively affects the setting of the live bacteria and forming colonies. That is why we have given you a natural gauge to check for temperature settings.
Step 3 — Add the starter Whisk a small amount of the warm milk into your starter culture to temper it, then stir the mixture back into the pot. This ensures even distribution of the culture throughout the milk.
Step 4 — Ferment Cover the pot and keep it in a warm, stable environment for 6 to 8 hours. A longer fermentation produces a thicker, more probiotic-rich yogurt. The natural insulating properties of clay help maintain a stable temperature during fermentation, particularly useful in cooler kitchens.
Step 5 — Strain for Greek-style yogurt Your Miriam’s clay pot yogurt is going to be much thicker than store bought or homemade metal or glass container yogurt, but if you want it to be even more thicker, like Greek yogurt, pour the finished yogurt into a cheesecloth-lined strainer set over a bowl and refrigerate for 2 to 4 hours. The liquid that drains off is whey, save it for smoothies, bread baking, or as a natural protein boost in soups.
How to Increase Protein in Your Homemade Yogurt Naturally
Once your yogurt is ready, there are several simple and wholesome ways to boost its protein content and nutritional value without reaching for a processed supplement:
- Stir in nut butter
- Add chia seeds or ground flax seeds
- Sprinkle with pumpkin or sunflower seeds
- Top with crushed nuts
- Add roasted lentils, channa dal, or dried edamame
- Serve alongside grated beetroot or cucumber
Common mistakes to avoid:
- Adding the starter when the milk is too hot kills the culture, always wait until the milk has cooled to receive and multiply the culture (abole ot hold your finger in the milk for 5 seconds or about 115 D F)
- Using ultra-pasteurized milk prevents proper setting, always check the label
- Disturbing the yogurt during fermentation disrupts the set, leave it alone once the culture is added
- Fermenting for too short a time produces a thin, under-cultured result aim for longer rather than shorter
Want to see the process in action? Wellness educator Sally Zimmermann put together a wonderful video and blog walking through yogurt making in a pure clay pot, and does a fantastic job explaining the properties of clay cooking along the way.
How to Make Kefir at Home
Makes: approximately 1 quart Prep time: 5 minutes Fermentation time: 24 to 48 hours
Ingredients:
- 1 quart whole milk
- 1 to 2 tbsp kefir grains
What is kefir and why it is good for you: Kefir is a fermented milk drink with a thin, pourable consistency and a tangy, slightly effervescent flavor. Unlike yogurt, which is cultured at a warm temperature, kefir ferments at room temperature, making it one of the simplest fermented foods to prepare at home. It contains a significantly more diverse probiotic profile than yogurt, with research consistently linking regular kefir consumption to improvements in gut microbiome diversity, lactose digestion, and immune function.
Instructions:
- Place kefir grains in a MEC Small Pot
- Pour the milk over the grains, leaving a couple of inches of headspace.
- Cover loosely, kefir needs airflow during fermentation, with a breathable cloth or loose lid.
- Leave at room temperature for 24 to 48 hours. A shorter fermentation produces a milder, less tangy result. Longer fermentation increases the acidity and probiotic density.
- When the kefir has thickened slightly and smells pleasantly tangy, strain out the grains using a non-metal strainer.
- Store the finished kefir in the refrigerator and return the grains to a fresh batch of milk to store in the fridge until the next batch is ready to be made. We recommend storing grains in a MEC Clay cup or bowl.
Yogurt vs kefir – what is the difference: Both are fermented dairy products with probiotic benefits, but they differ in several meaningful ways. Yogurt is cultured at warm temperatures using specific bacterial strains, producing a thick, spoonable product. Kefir ferments at room temperature using a broader and more complex community of bacteria and yeasts, producing a thin, drinkable result with a wider probiotic profile. The bacterium for kefir is believed to have first developed while storing milk in animal skin. Yogurt culture is created from pre-biotics found in vegetables.

How to Make Fresh Cheese at Home
Fresh cheese, like paneer is the most beginner-friendly recipe for homemade cheese. It requires no starter culture, no special equipment, and about 30 minutes of active time.
Simple Paneer recipe — serves 4
Ingredients:
- 1 half gallon whole milk
- 3 to 4 tbsp fresh lemon juice or white vinegar
- ½ tsp salt
Instructions:
- Heat the milk in your Medium MEC Pot over low to medium heat, stirring occasionally, until it reaches just below a boil, around 185 to 190°F. Small bubbles should be forming around the edges.
- Remove from heat and add the lemon juice or vinegar one tablespoon at a time, stirring gently. You will see the milk begin to curdle almost immediately, the curds separating from the transparent-yellow whey.
- Allow the mixture to sit undisturbed for 5 to 10 minutes to complete the curdling process.
- Line a colander with cheesecloth and pour the mixture through. Gather the corners of the cheesecloth and tie them together, then hang or press the bundle to drain for 30 minutes to 1 hour depending on your desired firmness.
- Season with salt and refrigerate until ready to use.
High-protein cheese options: Fresh paneer made this way delivers approximately 14 grams of protein per 100 grams, comparable to many processed cheeses but without the additives, preservatives, or packaging. For a higher-protein result, use whole milk with a higher protein content or add a tablespoon of dry milk powder before heating.
Why Miriam’s Non-Toxic Cookware Makes a Difference for Fermented Foods
Benefits of Cooking and Fermenting in Miriam’s Pure Clay
Traditional fermentation cultures around the world, from Indian dahi yogurt to Eastern European kefir to Middle Eastern labneh, were developed and refined in clay vessels. The material is not incidental to the tradition. It is part of why these foods developed the way they did.
Miriam’s pure clay is completely inert, it does not react with acidic milk, does not leach metals or compounds into the fermentation environment, and does not affect the culture activity developing within it. The gentle, natural insulating properties of our clay pots also support stable fermentation temperatures without the sharp heat conductivity of metal that can create localized overheating.
Miriam’s Earthen Cookware is the only cookware made from 100% primary clay sourced in the USA. We use no glazes, no coatings, no additives, no heavy metals. Every piece is tested and certified free of lead and cadmium. The surface that contacts your milk, your culture, and your finished fermented food is pure, unaltered earth, completely inert and completely transparent about what it is.
If you are making fermented foods for your health, the vessel deserves the same standard as the ingredients.


0 Comments
Write a Comment